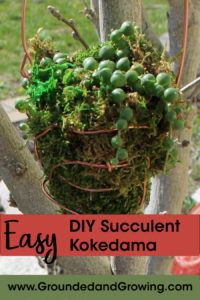
 Kokedama is an ancient Japanese art of growing plants in moss-covered balls of soil. This DIY version uses easy maintenance succulents and readily available, affordable supplies to create kokedama at a fraction of the cost seen in most catalogs.
This post contains affiliate links.
Background:
I first saw the term kokedama in a gardening catalog. The picture showed a ball of moss wrapped in twine with a plant growing out of the top. The kit (plant not included) was $29.95! I could see no good reason a package of soil, moss, twine and a wire form should cost that much. But it was so cute– I wanted one. So I came up with my own version to share with you.
It turns out kokedama, which literally means “moss ball” in Japanese, is an ancient art. It is sometimes called “poor man’s bonsai”. Some of the instructions I found were very detailed, calling for special soil, moss and even special twine. Many suggested planting ferns or tropical plants that need to be kept relatively moist to survive. I even saw one with a tiny citrus tree complete with fruits. There is no way anything like that would stay alive in my house more than a week. They would need too much attention.
I saw a few examples with succulents and thought– this could work! Succulents are so easy to maintain. It’s like they were meant to be a part of busy households. I didn’t really like the look of the twine, so I substituted copper-colored aluminum wire. You could use real copper wire if you’d like but it will be more expensive and not as easy to bend.
My sister Chrissy was visiting so I convinced her to make one. She said if she could make one, then anyone could. So there you have the ultimate testimonial!
Materials: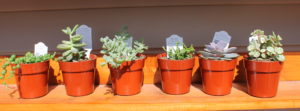
- Assorted succulents— I purchased plants in 3 inch pots, but there’s absolutely no reason you couldn’t use cuttings from an existing plant. Just remember to let the cut end dry for a few days before putting it in soil. Succulents generally don’t need any treatment with rooting powder, but if it makes you feel better go ahead and use it.
- Soil mix (optional)— I had cactus & succulent soil mix ready to go for this project, but didn’t end up needing it. The plants already had plenty of soil mix in their pots . If you decide to try this project using cuttings, you will definitely need some soil mix!
- Newspaper— I used some blank newsprint I had, but feel free to use old newspaper for this project.
- Scrap string or yarn— you just need enough to tie around the root ball of the plant
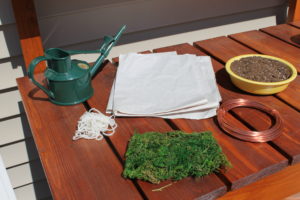
- Sheet moss— You can find this in the floral department of craft stores or of course Amazon. There are lots of different mosses available, make sure for this project you’re using the kind that is in a sheet you can cut or tear.
- Copper wire— I used this copper-colored aluminum wire because aluminum is easy to cut and bend, and it’s a lot less expensive than real copper.
- Needle-nose pliers— Use the kind that have cutting edges to make cutting the wire easier.
- Scissors— to cut yarn and moss
Instructions:
- Water all the plants you are going to use. We’re going to be taking them out of their pots and if the soil mix is dry, the root balls will tend to fall apart. We need them to stay together.
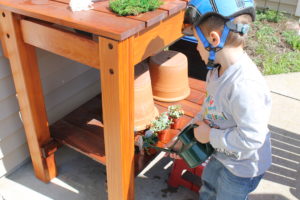
My son watering the succulents for our kokedama project. I have no idea why he insisted on wearing his bike helmet except that he’s three years old. Those of you that are parents need no explanation beyond that.
- Gently remove the plant from it’s pot and place it on a piece of newspaper. My piece was two sheets thick. You could use more sheets if you’d like, but I wouldn’t use less.
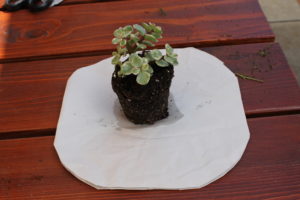
- Cut the newspaper into a circle that is big enough to cover the root ball.
- Gather the newspaper up around the root ball and secure it with yarn or string. It doesn’t need to be pretty, it just needs to hold all the soil in place. Remember that wet newspaper tears easily.
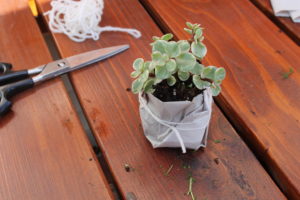
- This is where you may feel like you need a third hand, at least at first. Cut a piece of wire 2-2.5 feet long, and make a small loop (about as big around as the tip of your pliers) on one end. Cut or tear off a piece of sheet moss about 3 inches by 3 inches. The loop should rest around the top of your paper pot. Put the sheet moss in between the wire and the newspaper while winding the wire around in all directions. Add more moss as you go. There is no one right way to do this. It will look like a huge mess at first but keep shaping it, tucking in moss here and there and move the wire around to make a nice shape.
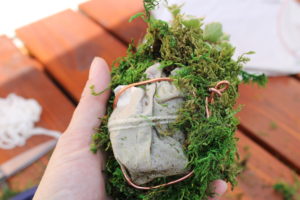
- You are creating a moss covered ball around the roots of the plant held in place with the wire. When you run out of wire cut another 2-2.5 foot piece and make another loop like you did before. Start with the loop on this piece directly opposite the first one. (We will use the loops to attach a third piece of wire for hanging at the end.)
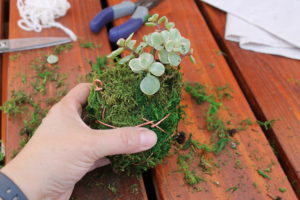
- When you’re happy with the placement of the moss and wire, cut another piece of wire for hanging. I used another 2 foot piece. Loop each end through the loops on the moss ball and hang in a sunny location.

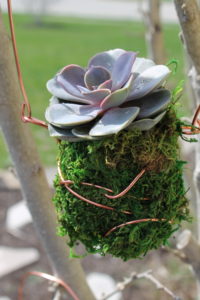
My first kokedama– Portulacaria ‘Variegata’
- This first kokedama seemed to take forever to make. But it was really more like 30 minutes counting all my do-overs along the way. My self-proclaimed non-gardening non-crafty sister took about 20 minutes to make hers and was impressed with her final result. I made a second one in less than 15 minutes. The only thing that stopped me from making more that day was I ran out of moss.
My sister’s kokedama– Echeveria ‘Perle von Nurnberg’ – isn’t it cute?!
- So what did it cost to make my own version of kokedama planted with a succulent? (Hint: a lot less than $29.95!)
- Succulent in 3″ pot: $3 each
- Sheet moss: $5 for 2 ounces; this was enough for 3 kokedama using succulents in 3″ pots ($1.67 each)
- Copper-colored aluminum wire: $7.40 for 39 feet; I used about 7.5 feet per kokedama ($1.42 each)
- Potting mix: I didn’t end up needing it.
- Newspaper, yarn, pliers and scissors: all things I already had at home
- Total cost: $6.09 (+ tax) per kokedama
I will definitely make a few more of these with my remaining succulents, and try at least one using a cutting. I’m curious to see how well they hold up over the course of the summer months. They should be pretty easy to water when needed, either with a watering can or just dunking them. As long as the soil doesn’t stay sopping wet the succulents should do pretty well. I predict at least some of them will be pretty overgrown by summer’s end and need to be remade into a bigger kokedama or planted into a larger pot.
Update– One Year Later:
One of my pet peeves about DIY garden projects is the majority of them show a newly planted garden and that’s it. I predicted last year that my kokedama would be overgrown by summer’s end. But they weren’t. They had grown some, and looked pretty happy. Here is a picture of them taken about a year after planting.
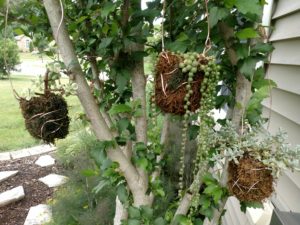
Left to right– Portulacaria ‘Variegata’, Senecio ‘String of Pearls’, and Oscularia.
Portulacaria ‘Variegata’ got sunburned and lost several leaves and was slow to regrow. It looks about the same as last year. But my Senecio ‘String of Pearls’ grew like crazy, even over the winter. It’s at least double, if not triple in size compared to last year. The Oscularia grew well and probably doubled in size in a year.
The preserved moss I used for the outside of the kokedama lost most of its bright green color and is just brown now, but still looks like moss. I may add a little fresh moss to spruce them up but other than color they have not broken down.
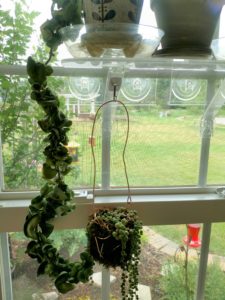
They were a bit tricky to overwinter since I made them to hang. I ended up using small Command hooks attached to my window shelves that I’ve mentioned previously. They looked great there all winter.
I watered them by soaking in a small bowl and used a squirt of this houseplant fertilizer about once a month. I don’t like to use fertilizers in the winter since most plants aren’t actively growing. But these were showing some new growth so I figured a little bit wouldn’t hurt.
This fertilizer is super-weak– you could make your own just by watering down a typical water-soluble fertilizer, but the ready-to-use pump made it super convenient to just add a bit while watering– which meant I actually
used it!
If you liked this post, please subscribe to Grounded and Growing today and receive your copy of “15 Tips to Become a '15 Minute Gardener'” so you can spend less time working ON your garden and more time enjoying being IN your garden.! It’s absolutely free. When you join the Grounded and Growing community, you’ll finally take the garden off your “To-Do” list and allow yourself time to enjoy your garden and savor the peace and serenity there. I tell subscribers about new posts as soon as I hit ‘publish’ and send weekly-ish updates on what’s going on in my garden– good, bad AND ugly.
All Rights Reserved. © 2019 Jennifer Schultz Nelson.
I love your DIY projects! I bought two of these at the Home Lawn and Garden Show in Bloomington last month. We are having a class at the Extension Office to try making them. Looking forward to making my own!
Thanks Pam! I hope you enjoy making them as much as I did! I discovered that the birds like them– they stole some of the moss! I guess that’s to be expected during nest making time. Thanks for reading!
I LOVE THIS!!! I will definitely be making these soon and hanging them throughout my outdoor Fairy Village! I’m going to add little lights to them and hang them at different lengths as a way to light the way home for the fairies! They will look like floating orbs of light at night! So awesome! Thank you Jen!
Thanks Michelle! Send me pictures when you get them made and I’ll post them on the Grounded and Growing Facebook page if you’re ok with that!! I’m glad I could give you some inspiration!
So, what about using coffee filters instead of newsprint?
I love that idea! I used the newsprint because it’s what I happened to have on hand at the time. Next time I bet the coffee filters would hold together longer. Thanks for the idea!
I Made 6{six} … But, I Used SNAKE PLANTz. They Are Turñig Yellowizh.. @ 1zt, I Soaked oñce evëry 2{two} Wzk…
Ñow, I Ñeed Tô Kñow Hõw Tõ Briñg THEN Bk Tô THEIR GRËËN BÛEATY…
It sounds like you are watering way too much. Back off on the watering and wait until the soil is dry before watering again. Snake plants usually only need watering every month or so (even less in the winter months).