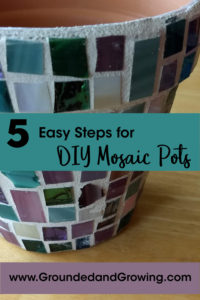
 Make easy, beautiful and unique mosaic flower pots using terra cotta pots and stained glass tiles. ** Note: you will find it hard to make just one! This post contains affiliate links for your shopping convenience.
I’ve always loved the look of tile mosaics– either small tiles or broken bits old pottery and tiles applied to another surface and grouted.
My first experiment with making my own mosaic project was for my wedding back in 2005. Money was tight, but I wanted to incorporate something handmade into the décor. I also wanted something for each table that would last longer than a cut flower arrangement.
I ended up putting a single orchid plant on each table in a terra cotta clay pot decorated with a mosaic of stained glass tiles in our wedding colors. They were a hit.
This is a great project if you don’t have a lot of time for crafting, as you can stop and start the project easily. In fact, you can’t finish it all in one day! You need to allow for some drying time.
Supplies
** Supply names in green are affiliate links for your shopping convenience.
Terra cotta pots
Plain old terra cotta clay pots are perfect for this project. You probably have a few around your house right now. If not, they are readily available and generally pretty inexpensive.
Sealant
There are lots of versions of tile/grout/stone/ceramic sealers available. The link is for what I used in this project, and it has worked well and lasted for years without any issues.
Stained glass tiles
Back when I did the mosaic pots for my wedding, I bought all my tiles through a shop on eBay. Most recently, I’ve been buying through Amazon (as in the links here). There are seemingly unlimited colors and quantities available. Be sure to read the reviews, especially if the price for what you get seems too good to be true.
Adhesive
I’ve had great results that have lasted for years using clear, acrylic caulk. Even if it says “siliconized” acrylic caulk is easy to clean up with soap and water. Straight silicone caulk will not clean up with soap and water. Since I end up using my fingers to spread the caulk, I’m all for easy clean up so I stick to the acrylic caulk.
Sanded grout
This is standard grout used for kitchen and bathroom tile. Choose a color that coordinates with your tile. I’ve also had good results painting the grout with acrylic craft paint after the grout has fully cured.
Instructions
1. Pots
It’s critical that the pot you use is rigid and inflexible. Any movement like with a thin plastic pot will make it hard for the tiles to stay in place. I used terra cotta pots for this project, but ceramic, glass or wooden pots could potentially work as well.
2. Sealant
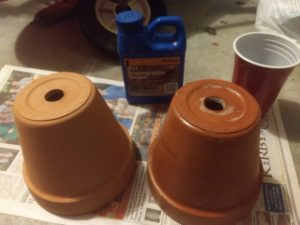
When you apply the sealer the pot looks wet at first (right) but dries to look pretty much as it did before the sealer (left).
Moisture will also potentially shorten a mosaic’s life. If you’ve ever experienced a water leak behind a tiled wall in a bathroom, you know that water behind tiles will loosen them over time. I was a little a lot paranoid about this while making the pots for our wedding reception. All I could picture was tiles popping off before the wedding or as soon as anyone tried to use the pots for plants later on.
The best solution I came up with was to seal the porous terra cotta surface before applying the mosaic. I used a penetrating sealer designed for tile, grout and natural stone. I poured a little into a disposable cup and applied it to my pots with a sponge applicator brush.
This is the same sealer I used for the tiles in my stained glass stepping stone project. In a pinch I’ve used clear spray acrylic, but I really prefer the grout and tile sealer.
Apply the sealer to all surfaces of the pot, inside and out. Let dry thoroughly before adding tiles.
3. Tiles & Adhesive
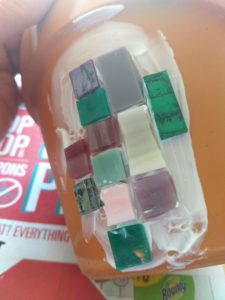
I work in small sections when adding tiles.
From my experience, I find 1/2″ tiles easiest to work with on pots. Anything bigger would be hard to adhere to the curved surface. I did use some rectangles that were longer than 1/2″ in the project pictured. As long as I positioned them with the long side of the rectangle oriented to run top to bottom on the pot, they fit fine.
I used 1/2″ stained glass tiles, but you can also use broken plates, cups or ceramic tiles for your mosaic. Just keep in mind that some curved pieces may be hard to fit on your pot. You may need to cut them smaller or use a different pot in order to get a good fit.
I used clear acrylic caulk to adhere the tiles to my pot. I wanted something that would attach the tiles securely and dry clear but would still be able to clean up with soap and water. Silicone caulk would work too, but it doesn’t clean up with soap and water.
To glue the tiles, work in small sections on your pot. I find it easier to do the rim separate from the rest of the pot.
Squirt a small blob of caulk onto the pot, and spread it out to a thin layer using a popsicle stick or your finger (I think a finger works best!) Set the tiles into the caulk, leaving about 1/8″ in between each tile. Try to avoid letting the caulk squish up in between the tiles so there’s room for the grout in next step. You will probably need to experiment with how thin you spread the caulk before adding tiles.
How many tiles do I need?
I used about 200 1/2″ tiles for a standard 6″ terra cotta pot, and about 150 1/2″ tiles for a standard 4″ terra cotta pot.
4. Grout
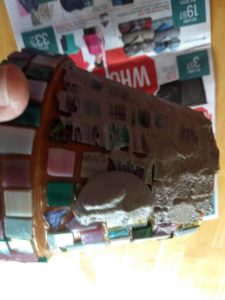
Like with adding tiles, I work in small sections when grouting. I add a small amount of grout and use my fingers to work it between the tiles.
Mix a small amount of sanded grout according to the package directions. Use a disposable container for easy cleanup. For the 6″ pot pictured, I used about one cup of dry grout.
Apply the grout to the tiled pot, making sure grout goes between each tile. Pay close attention to the top edge of the pot, the area just below the rim, and along the lower edge of the pot beneath the bottom row of tiles.
Let the grout set for about 20-30 minutes and use a damp rag or sponge to clean the excess grout from the tiles. Be careful to not disturb the grout between the tiles. Let the grout cure overnight.
5. Sealant (again)
You probably could use the mosaic pot as-is at this point, but in order to protect your hard work, I strongly suggest you seal the finished pot, just as you did in the first step.
Wait to seal your mosaic pot until the grout has fully cured. Check your individual package of grout, but the brand I used said the grout would be fully cured after 3 weeks.
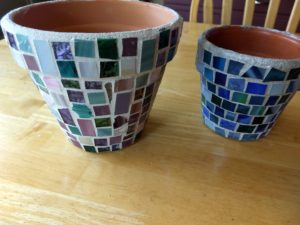
On the right, one of the 4-inch pots I made for my wedding reception, still looking good after all these years. On the left, the 6-inch pot I made most recently for this post.
Use the same product to seal the finished pot as you used for the bare pot in the first step. Clear spray acrylic also works, or I’ve also used acrylic paint (on the grout only). The gray grout I used for my wedding pots was too dull so I added some bling with sparkly silver acrylic craft paint).
Yes, try this at home!
I hope this post inspires you to take the leap and make a mosaic pot of your own. Even if you don’t consider yourself “crafty” or “artistic”, these pots will look great. This is a great project if your free time is fragmented, as there is a lot of “stop-and-wait-to-dry” time.
This is also a great project for school age children with a little adult help. Teens can probably handle the whole project themselves.
If you liked this post, please subscribe to Grounded and Growing today and receive your copy of “15 Tips to Become a '15 Minute Gardener'” so you can spend less time working ON your garden and more time enjoying being IN your garden.! It’s absolutely free. When you join the Grounded and Growing community, you’ll finally take the garden off your “To-Do” list and allow yourself time to enjoy your garden and savor the peace and serenity there. I tell subscribers about new posts as soon as I hit ‘publish’ and send weekly-ish updates on what’s going on in my garden– good, bad AND ugly.
All Rights Reserved. © 2019 Jennifer Schultz Nelson.



Do you need to use dry grout or could I use a container of grout that is already mixed.
I think premixed grout would work just fine. I never knew that it existed! (If I did I would’ve used it because it sounds way more convenient!)
Am a beginner and I was taught to use Wellbond 6000 with mosaics. She didn’t mention a sealant. Is it different when you mosaic a terra cotta pot?
I used caulk as adhesive for the pots simply because it provided a permanent, waterproof and flexible bond– and I didn’t know about Wellbond 6000 at the time. I think Wellbond 6000 would be an excellent choice for this project because it is also permanent, waterproof and flexible. I only recently discovered this “magic glue” (as we call it at my house) when I was looking for an adhesive to bond glass to glass for my glass mushroom post. Even though terra cotta, or glass are rigid materials, you still expect some level of flexing, especially with temperature changes.
I chose to seal my terra cotta pots before applying the mosaic tiles because of how porous terra cotta is by nature. I was afraid if moisture got behind the tiles when the pot got wet, that would increase the chance of the tiles popping off at some point. So far, the pot I made in 2006 as a prototype for my wedding centerpieces hasn’t lost a single tile.
I would like to be part of this group. Please ad me on your email list
I will get you added to my email list! Thanks for the request!